


Guides
Animation
Preface
The goal of these Guides is to help you create a mental model for basic principles of our demo maps work.
Thi is not the final truth, there are many ways to achieve the same result.
Overview
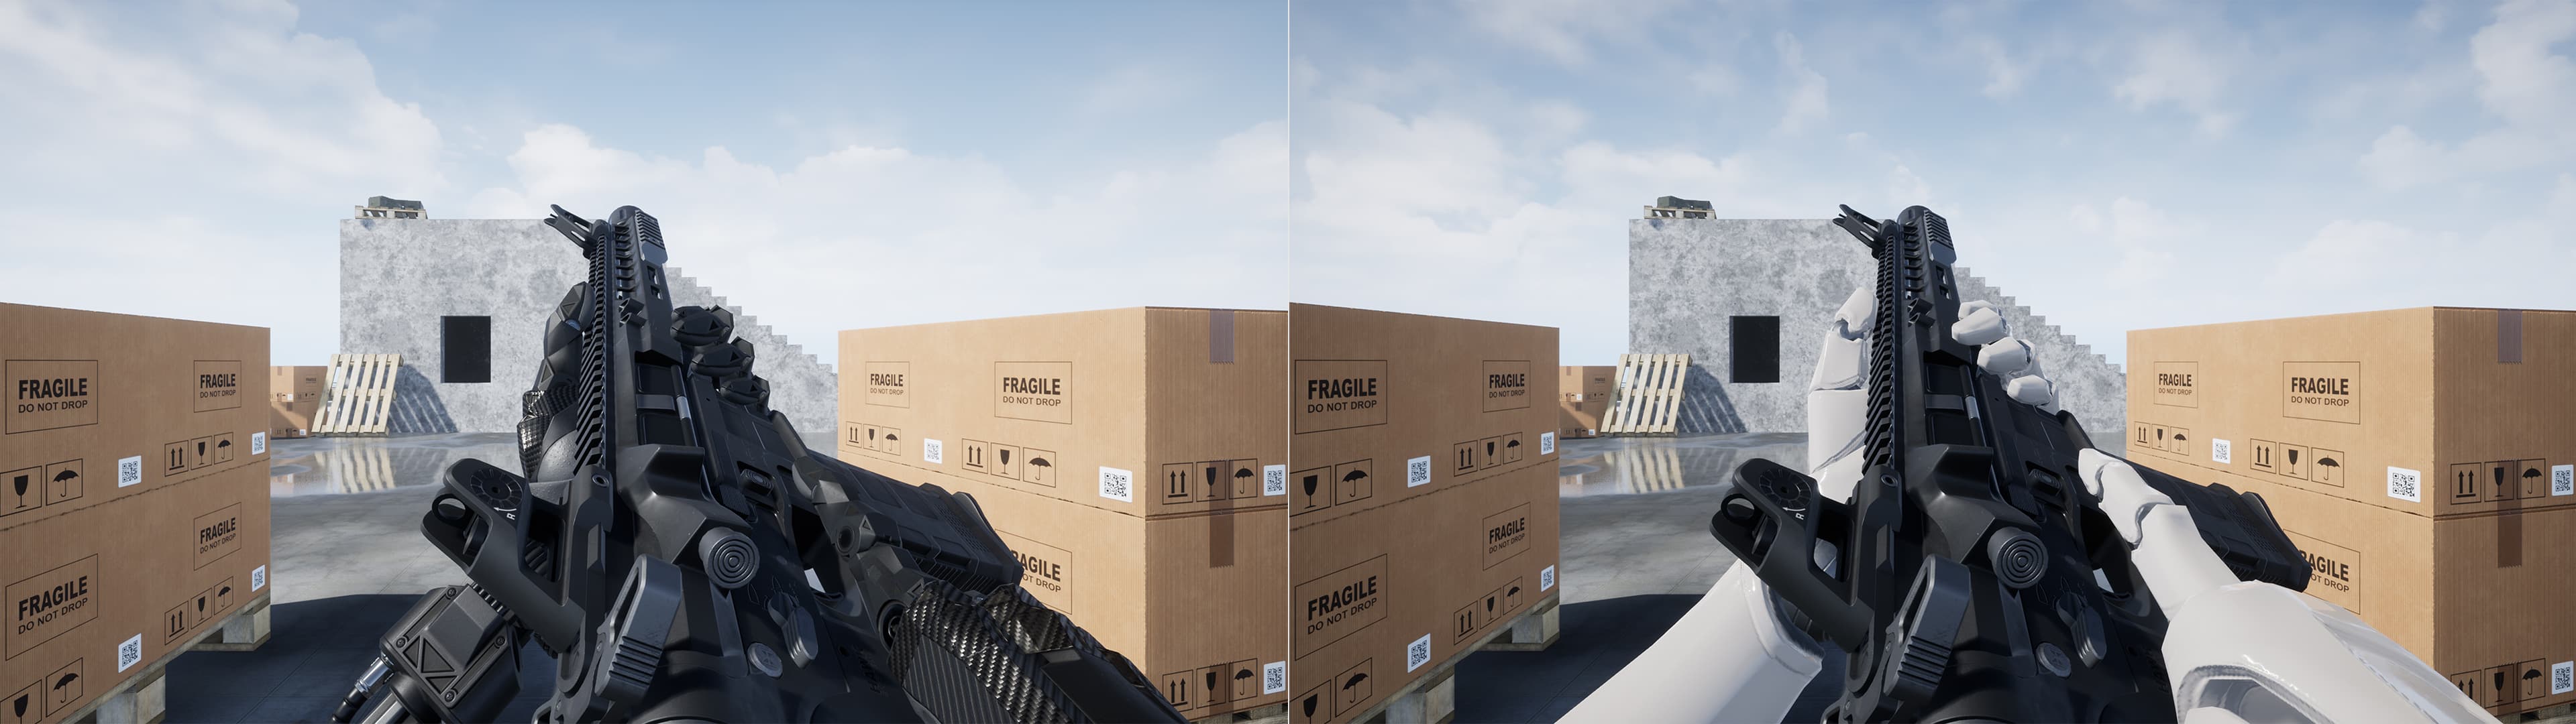
Since the character and weapon are different skeletal meshes, each has its own set of animations (similar action - the same duration). Weapon is attached to the socket "WeaponSocket" located on the ik_hand_gun bone in the skeleton's hierarchy of the Character. This bone and it's parent - ik_hand_root are animated to manipulate a weapon in space. This method gives freedom in throwing the weapon from hand to hand and eliminates the monkey dance with attaching/detaching weapon from hand to hand. Also, by IK manipulation with ik_hand_root it is possible to create procedural effects such as recoil, weapon sway etc. ik_hand_l and ik_hand_r are animated too (in hand placeholder manner). This allows to use FABRIK to bind wrists to their target position relative to ik root, which may be helpful for customizing of left hand placement on the weapon forend (сloser or farther) and be able to return hand to it's target position while hand is removed from the forend using curve or lerp alpha, for example - the moment of grab the mag during reload.
The main line of animation programming pipeline:
- Sync play state of both Anim Blueprints;
- Maintain gameplay dynamics while achieving a more realistic look (using animation interruption to make animation start/end inertia friendly with player control).
State machine is used for locomotion-related motions. For basic actions (fire, reload, interact etc.) - animation montage flow. This allows you to get pretty results for blending animations, including layering, interruption etc.
Some animations have variations based on the leading arm, such as the jogging stop phase to help get a more realistic blends.
Retargeting
UE5
Preparation steps for retargeting to UE Mannequin:
- Create new asset: Animation -> IK Rig
- Add new chains:
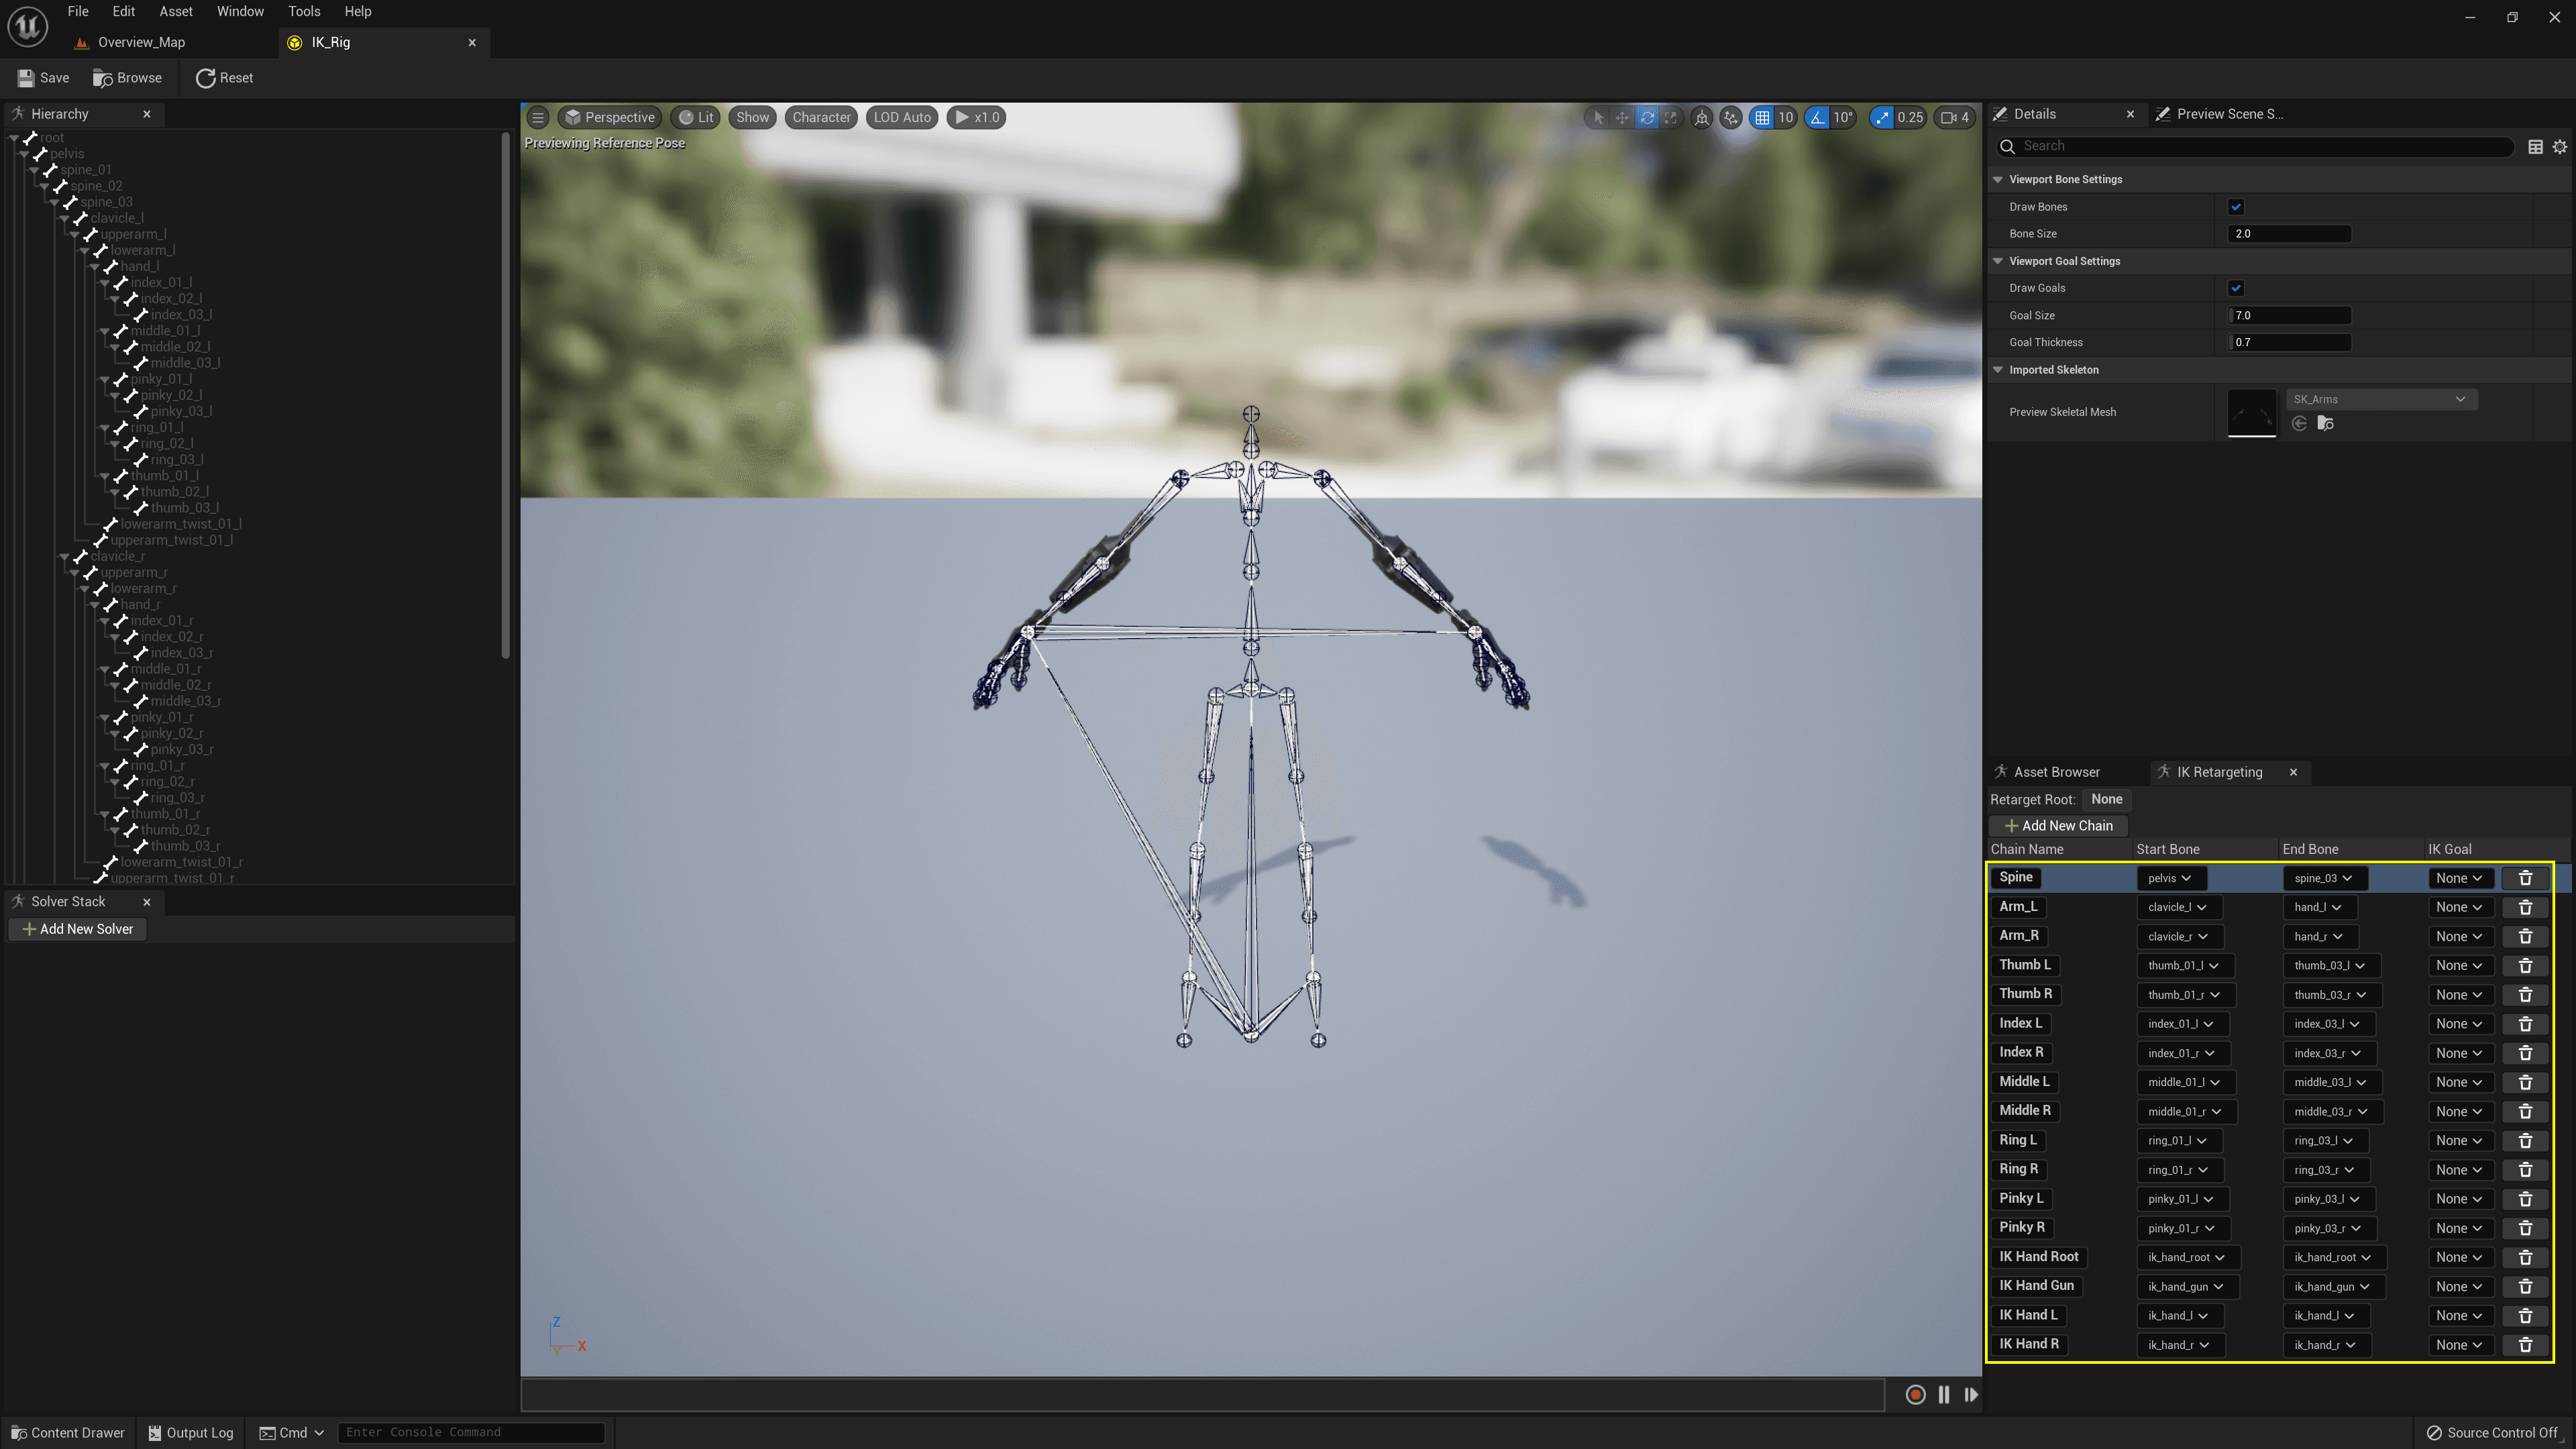
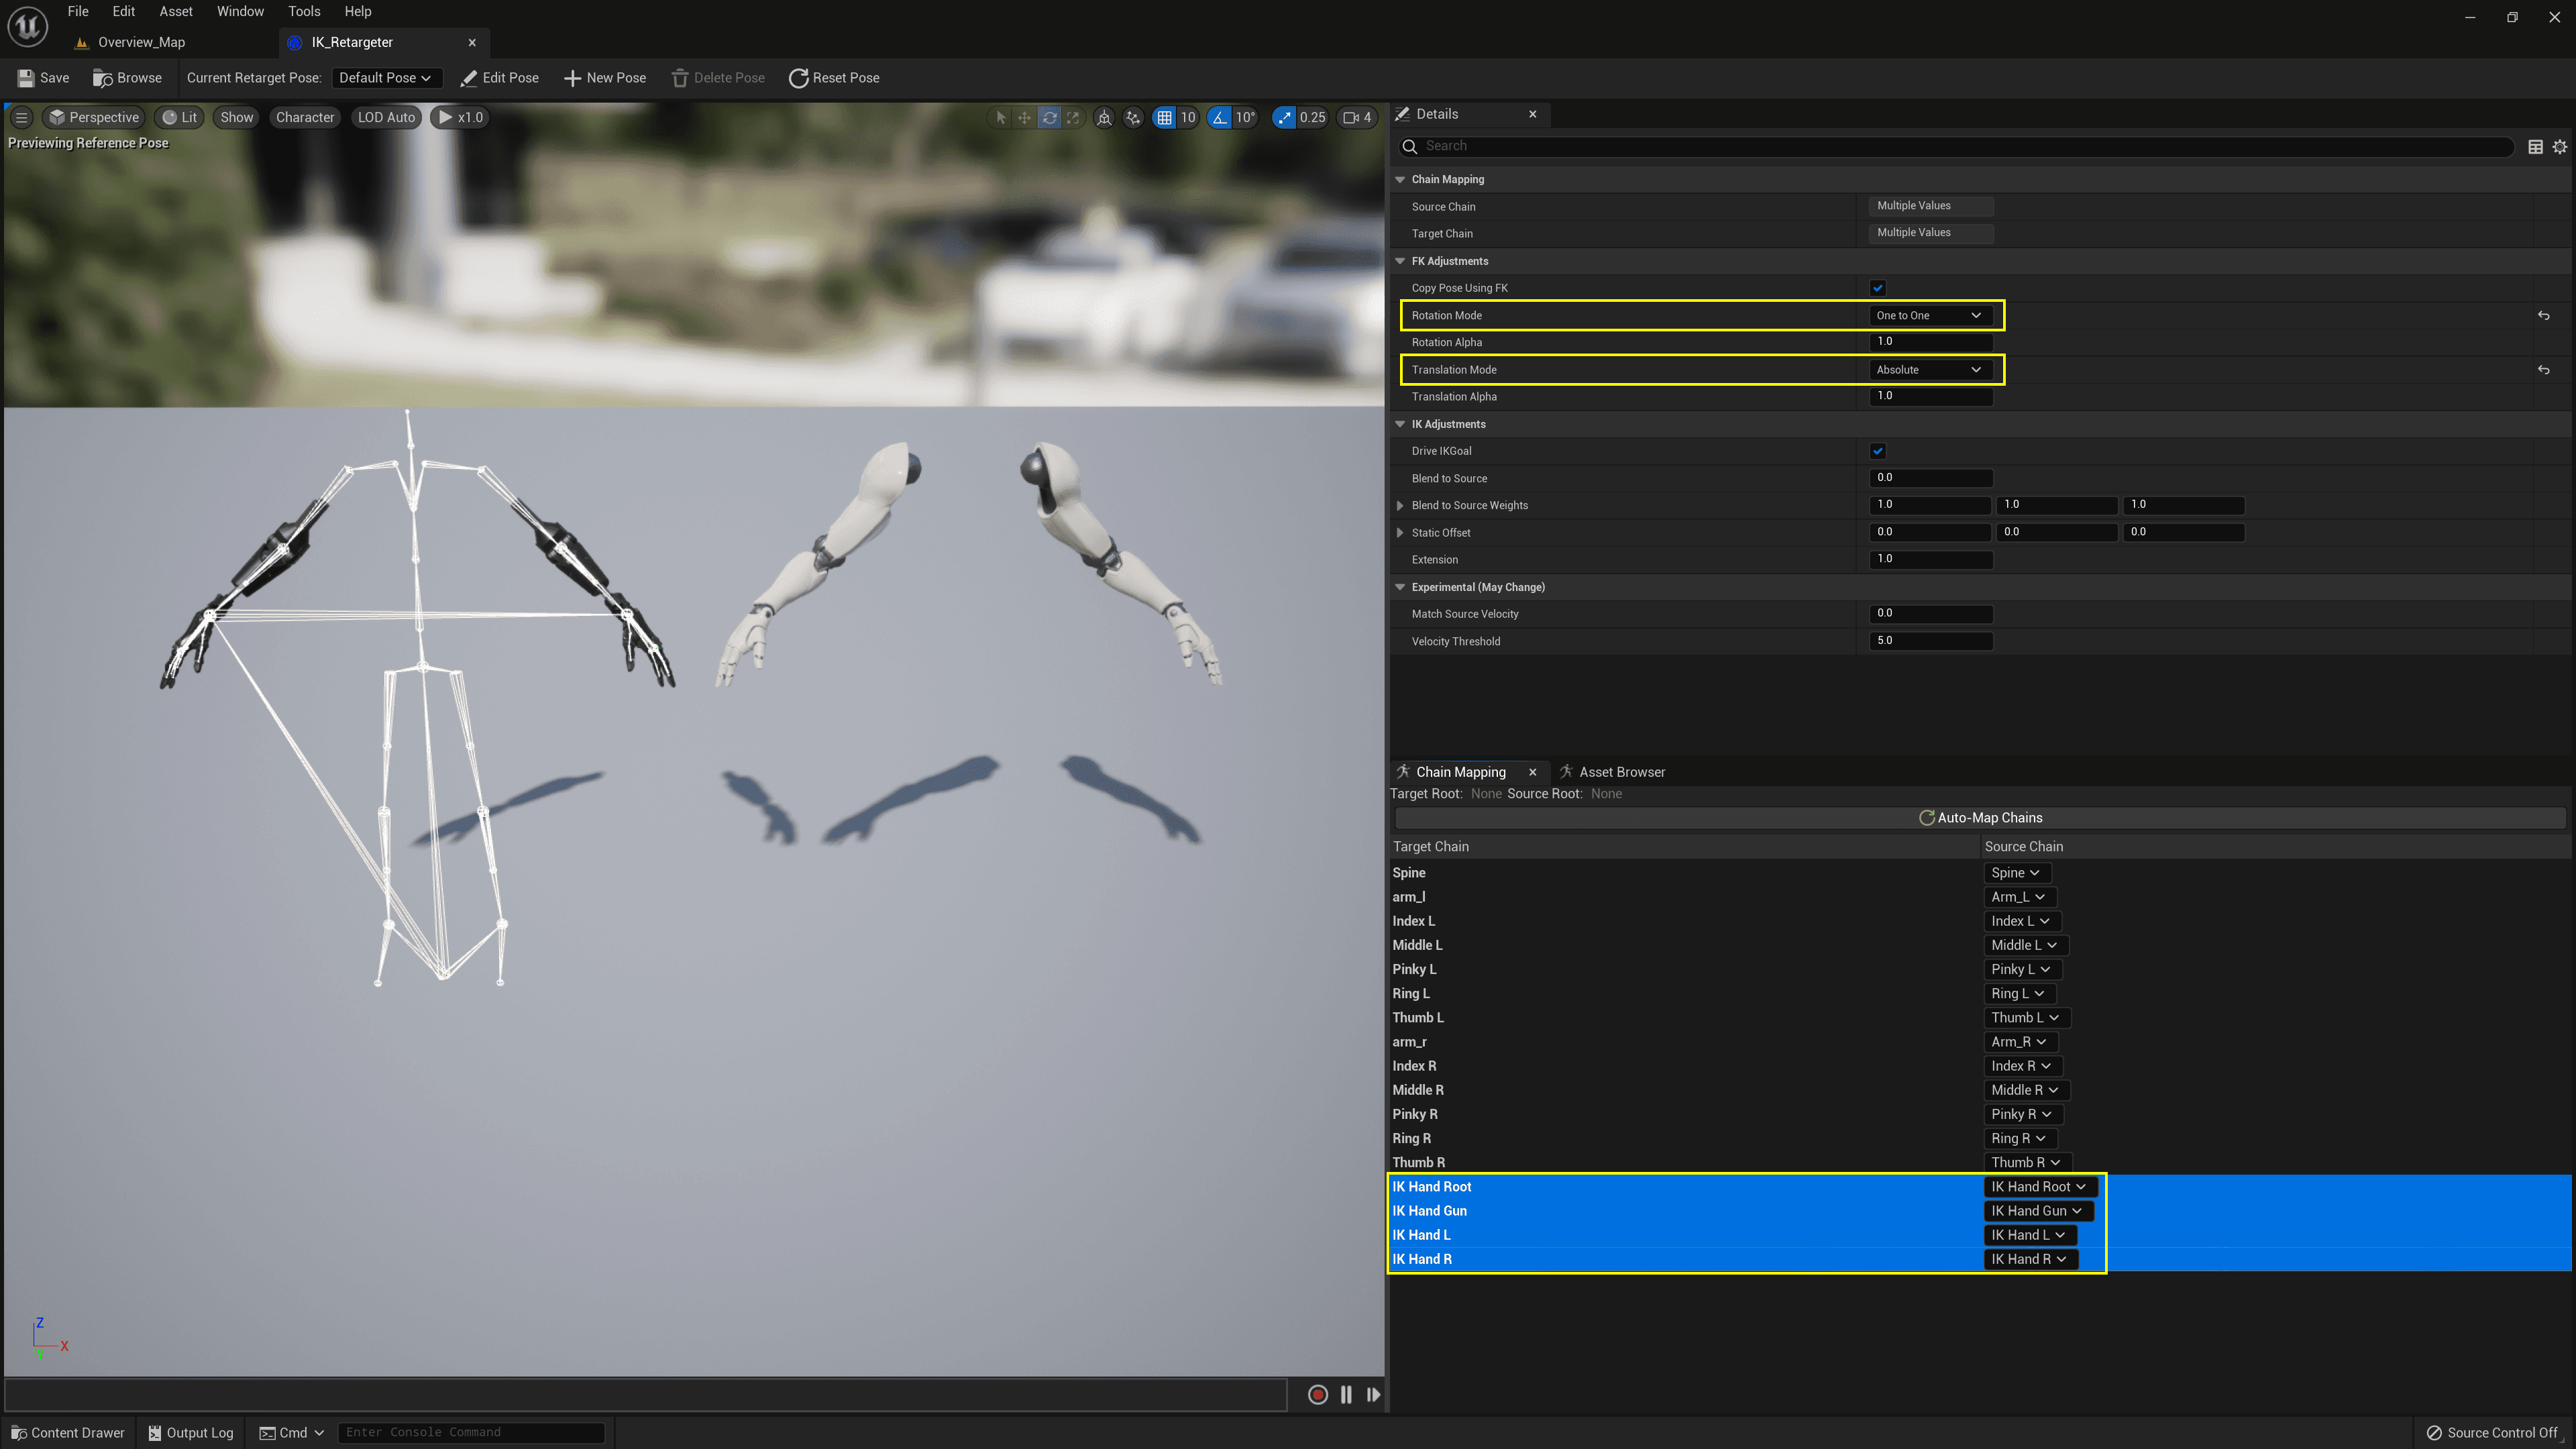
- Create new asset: Animation -> IK Retargeter
- Select the newly created IK Rig as "Target IKRig Asset"
- Select Mannequin as "Target Preview Mesh"
- Set Rotation Mode to "One to One" and Translation Mode to "Absolute" for IK bone chains:
- IK Hand Root
- IK Hand Gun
- IK Hand L
- IK Hand R
UE4
Preparation steps for retargeting to UE Mannequin:
- Open UE Mannequin's (target) skeleton asset editor.
- Go to skeleton hierarchy, click "Options".
- Check "Show Retargeting Options".
- Set all bones to "Skeleton".
- Set IK bones to "Animation":
- ik_hand_root
- ik_hand_gun
- ik_hand_l
- ik_hand_r
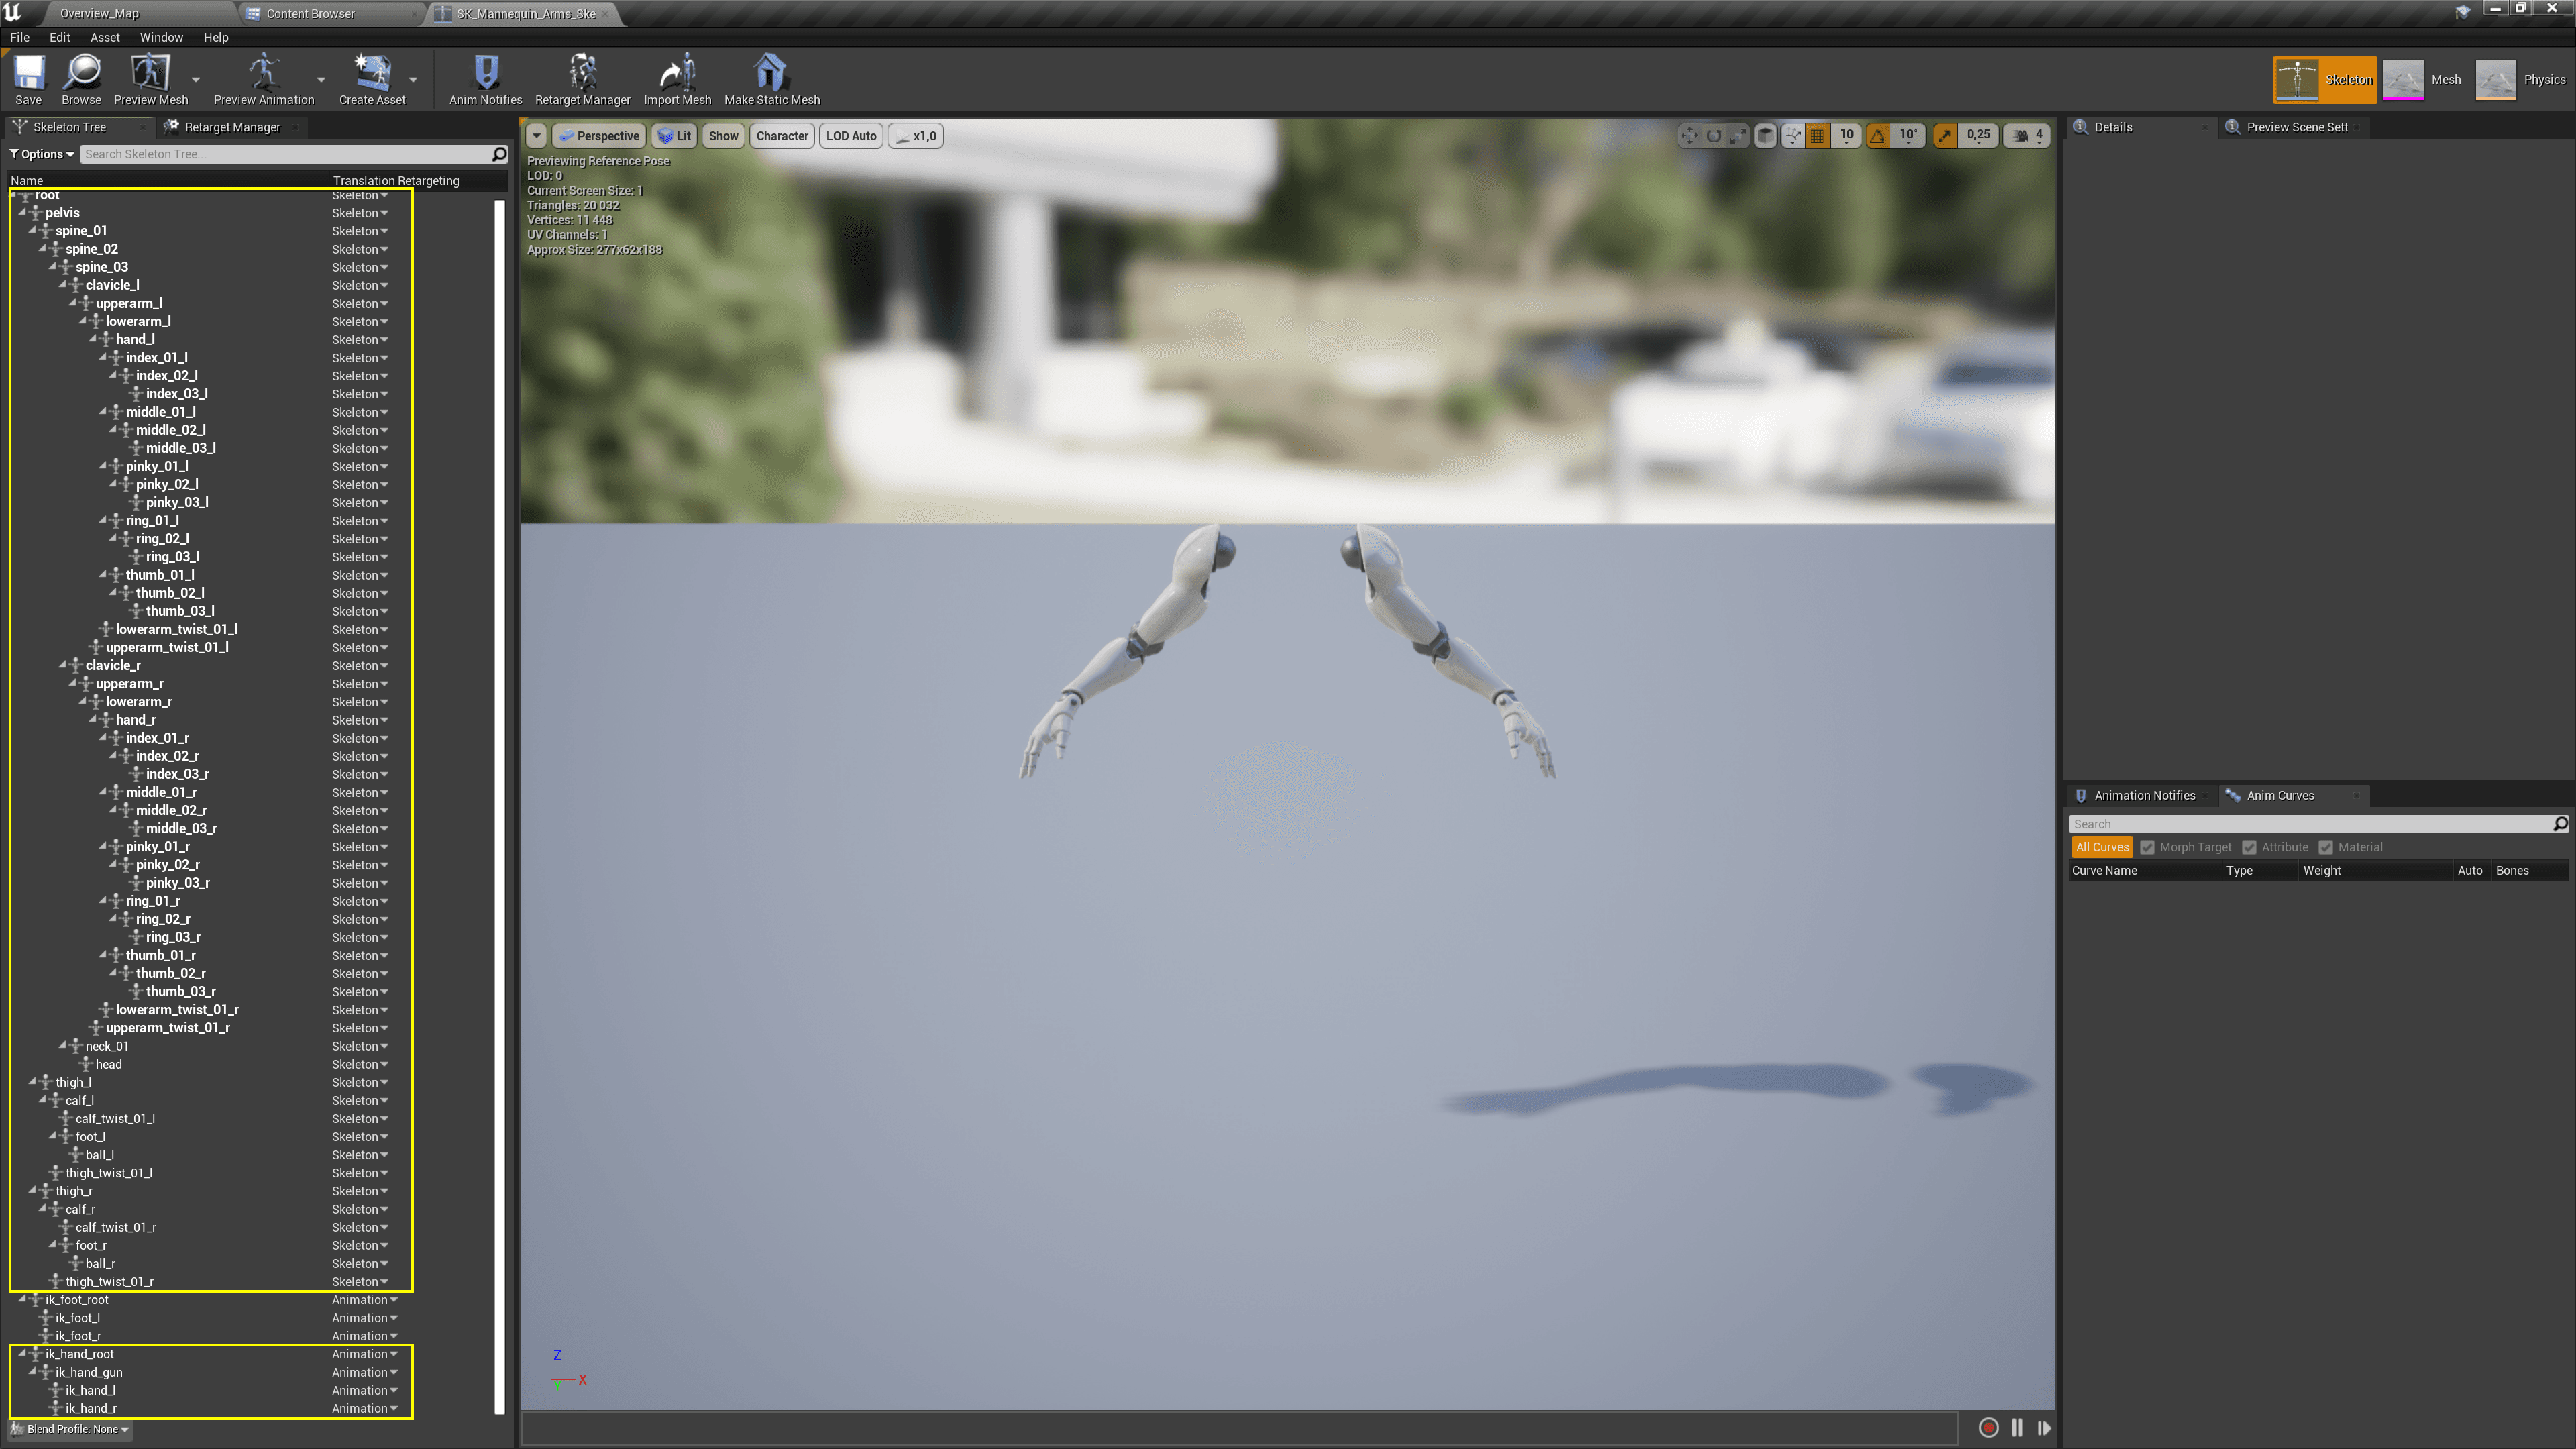
- Open "Retarget Manager".
- Click "Show Advanced" in Humanoid Rig.
- Remove this bones from bone mapping:
- lowerarm_twist_01_l
- lowerarm_twist_01_r

Twist correction
The way we animate lower arm twists for our robotic cybernetic arms mesh, comes from the mesh design. If you plan to use UE Mannequin or custom character, we recommend unbind/not bind (depending on UE version) lowerarm_twist_01_l and lowerarm_twist_01_r as described above. Then drive twists rotations and/or morph targets with IK. Twist correction workflow depends on your target character mesh topology, weight skinning and a level of quality you want to archive.
Custom character design
Animation retargeting is rather painful process for FP projects to stay in standard of UE Mannequin. The character design requires more attention to the position of the bones to strike a balance between ensuring proper deformations and preserving animation angles after retargeting. Even a slight deviation of the animation angles leads to falling fingers into the mesh of the weapon or, conversely, hanging fingers in the air. These small deviations are rarely noticeable in TP projects and are acceptable, but when you get a close-up view of the FP camera, these problems are immediately become apparent. This issues with offsets may be fixed with IK or trying to tweak the retargeting pose, but it is better to take this into account at the design stage.
As of lowerarm twist correction, in our experience, more realistic first-person human meshes should have more than one twist joint per lowerarm to save shape while skin deformation occurs. One closer to elbow, not animated at all to prevent muscle shape and another closer to wrist to fight with knotting via reaching roll rotation of wrist. The best way we reached to handle lowerarm twist deformations for first-person human (!) characters - is to use combination of properly skinned twists, picking up the rotation multiplier from the wrist and making blend shapes in 2 poses - extreme rotation positions for lowerarm while palm up and down and using TwistCorrective IK Animation node inside UE anim graph.